Showing posts with label Canopy. Show all posts

Sunday, December 28, 2014

Its been a good week

I have to say that I am happy with this weeks progress.  I took care of several items that are on the list of things that need to get done before the move to the hangar.  I got to go flying with Jeff and Harry again which is always fun and a great motivator.  And last but not least I had a wonderful Christmas thanks to Amy.  She really takes Christmas to heart and the house is nicely decorated, there are presents under the tree for everybody and there is true Christmas spirit in the house.

Back to the progress of this week.  You recall that last week I made the decision to give up on the center console and that means I had to redo the throttle and mixture cables.  I had concerns that the brackets I fabricated for the engine would have to be re-done but I am happy to report that the new cables use the same ends as the old cables and seem to be the same length so it looks like my brackets will work!  That should save me about a day of work.  Along those lines I also had to re-do my switch panel because the one I had did not have enough room for the holes that the throttle and mixture controls go through.  I decided to try out a local company that did a presentation at one of our EAA chapter meetings.  They have some software that you can use to design any panel and then order it directly.  They will mill it to specification and even fill in any engraving you have.  I'm excited about getting that next week...hopefully early next week so I can finish up the cockpit.

Its a little hard to see unless you click on the picture to go full size but this is the new switch panel design that I sent to Front Panel Express.  I can't wait to get the final product.
OK, on to the pictures...

After lots of work on the induction system I think I am going to call it good.  I have a little work on the alternate air portion but otherwise it is ready.  This is a shot of the inlet with a nice gap.

And here is the clearance from the lower cowl.

Taking a page out of Jeff's book I decided to put small windows in the inspection covers for the elevator push-rod ends.  This is a picture of the inside with the new windows installed.

And this is a picture of the inspection cover installed.  I think it is going to work nicely!

I finally got a chance to set up my "paint booth" to prime the baffle parts.  I ended up cutting the paint booth down a bit so I could easily put it away and take it out when I needed it.

I also took the time to "glue" the finger pull to the top of the slider canopy.  This should help with the opening of the canopy when its fully closed.

Finally I spent Sunday doing nut-plates on the wings since I have to wait for the switch panel to get finished before I move forward on the fuselage.  Yes, all day (except for the time I took off to watch the Seahawks game).  There were 78 nut-plates installed today.  That doesn't sound like much but stop to consider how much work that is...I had to match drill three holes per nut-plate, debur and dimple those 234 holes, and then rivet the nut-plates to the wing.  Oh and since I was working blind I ended up missing one end of the nut-plate on 4 holes that meant I had to drill out the rivets and try again.


These are the wing root fairing nut plates. 30 nut plates and about 18 more on the fuel tanks yet to do.

One of the six lower wing access plates.  Can you see the boo boo in this picture?  I caught it after I took the picture.

Test fitting the cover plates.

And one of the access plates finished including the screws.

Sunday, November 23, 2014

A little here...a little there...

Lots of details this week.  Not many pictures but lots of smaller tasks complete.  First, the instrument panel is installed...at least temporarily.  I say temporarily because I decided to order and install an instrument that will monitor and allow me some control over my electronic ignition system.  That instrument has to be mounted in the panel so at least one more time I will be pulling my pilot side panel out to cut yet another hole.

Jeff came over on Sunday to give me a hand and I had planned on having him help me fill the brake system with fluid.  Turns out I didn't have the pump necessary (oil squirt can) so instead we installed the canopy again and then chatted about various things.  I later went to the local auto parts store and purchased the squirt can and then filled the brake system.  I also greased the nose wheel pivot while I was doing the greasy stuff.

I went through the fuel system and installed the remaining hoses.  I found I still have one hose that is about 3" too long so I will be sending that one back for a trim.  The rest of the system seems to be good now.

One of the items on my list of to-do's before I take the airplane to the airport is to get the throttle and mixture cables installed.  Well since I am using a center console and forward facing induction I am having to fabricate the mounts for both ends of the cables.  For the center console I had to remove one of the inner bulkheads and move it about an inch forward, re-drill, dimple and rivet it before I could install a clamping system that will safely attach the cables.  For the engine side I have to fabricate a couple of brackets to do the same thing but these have to be made from steel instead of aluminum.  I am in the process of fabricating them from aluminum now and when I get the geometry correct I will make them from steel.

And of course I spent a lot of time this week on the plenum.  I can't wait until I can start doing weekly posts that don't have the word plenum in it....that day is coming soon as you can see from the pictures below.  Maybe one more post since this is Thanksgiving week and I have lots of airplane time in the mix.

First on the list for the week was the right side panel.  Mark took this picture of me watching the CNC machine cut the panel out of carbon fiber.

I realize that its hard to take a picture of carbon fiber but this is about as good as I could do without being out in the daylight and its WAY to cold out there to be rolling the airplane outside for a photo shoot.

Remember a week or two ago when I showed the pictures of the oil separator drain/check valve?  Well, here is the final solution.  I trimmed off the flange that is suppose to be hose clamped to the pipe.  Then I drilled the hole for the drain to fit into.  Now I have to take it to a TIG welder on Tuesday to have it welded in place.

The plenum is getting very close to being done.  I spent a lot of time sanding, fiber-glassing parts and waiting...  Here is the last piece to be added to the beast.  Its the aft right side corner where the oil cooler would normally sit.

And this is what it looks like Sunday evening.  The plenum is now whole and ready for finishing.  Lots of micro and sanding...drilling of holes to final size.. priming...and installation of some plate nuts that allow me to bolt it to the baffles.  Speaking of baffles you will notice I trimmed them down to their final size.  Getting close!
Just for fun I decided to fabricate this little finger pull from carbon fiber.  I was going to use Tee aluminum but nobody in the Seattle area sells the stuff so I decided to give it a try using carbon fiber.  I'm glad I did, this actually turned out pretty nice.  I will probably paint it eventually but in the mean time it looks cool, is very light, and very strong.  You can see where it goes in the next picture.

This is the top of the sliding canopy.  When the canopy slides shut it actually drops down about 3" or so on the aft side to seal the cockpit.  It can be a bugger to slide the canopy open from the outside without lifting the aft end of the canopy.  By attaching this finger pull at the aft end  I will be able to lift up and pull back which should make opening the canopy much easier.


Friday, October 10, 2014

Time to take a break

I am so frustrated with this plenum that I have decided to move on.  I'm going to break something or say something I shouldn't so its best to just start working on something enjoyable while I ponder my next steps on the plenum.  As it stands right now my options are to jury-rig it to make it work until I get some time to make a new one (that fits) or just bite the bullet and design my own now.  Its sad that I paid $460 for piece of fiberglass that I can't use.  I guess the bright side of the whole issue is I learned a lot about plenums in the past week!

So moving on I decided it was time to work on the oil cooler ducting....

First step was to pull the oil cooler off the firewall so I could do the fiberglass layup directly on the cooler.  Here you see the cooler with a Styrofoam mold that I formed using sheets of Styrofoam board hot glued together and then molded with a saw and sandpaper into the shape I wanted.

Another picture of the mold from the other side.

Next I laid up a couple of layers of fiberglass tape followed by a layer of carbon fiber for stiffness.  The carbon fiber cloth was a very heavy weave so it frayed all over the place.  for the piece that goes on the back of the baffles I will attempt to use my vacuum bagging process.

Here it is after I chipped the foam out of it, smoothed the outside with micro/epoxy and then sprayed a coat of high build primer on it.  I still have some build-up around the flange where it got a bit thin but its looking pretty good so far.
While I wait for the first part to dry I started working on the baffle part.  I forgot to take a picture of it after I had formed the mold but its similar to the first piece except this one has a flat flange that will bolt to the aft baffles.  You will see it once I get it trimmed.  My vacuum pump was putting out a lot of oil vapor or smoke so I only let it run for a couple of hours.  I hope that was enough to let the epoxy set up hard enough to hold shape.  We will see in 12 hours what it looks like....


Oh, I also started fitting the induction system to the lower cowl.  Well as is par for the course the past week or so, it didn't fit.  I few iterations of trimming and I got it to fit length wise.  However, Will sells two version of the backing plate, one that is normal and one with an angle in it that is suppose to work well for cold air induction systems like mine.  Well, turns out my air inlet is almost perfectly aligned with the fuel servo inlet so I need a different backing plate.  See the picture below.

See that beveled shadow?  It shouldn't be there.

Even after trimming about an inch off the end I am just barely fitting.  I still need to trim at least another quarter inch off the end unless the new backing plate gives me the room I need, which it might.

Here is the view from the outside looking down the air inlet.  You can see the fuel servo back there (blue tape covering the air inlet) and its pretty close to perfectly aligned.
I finished sanding the windshield fairing and shot a coat of primer to check the actual condition.  Turns out it was pretty good and only a little more sanding was required to smooth it up a bit more.

And after the last coat of primer I removed the masking and plastic and here it is!  Its not perfect but I am very happy with how it has turned out.  Now I need to finish up the canopy skirt and I will have met my goal for the summer of finishing the plexi work.

Monday, September 29, 2014

Fall begins

We rolled into Fall this week and it made me look back at the last 18 months.  Fall always feels like things are "winding down" and as such its a good time to reflect on where we have been.  In relation to this dream of mine to build an airplane I have nothing but wonderful memories.  I am so unbelievably fortunate to have the life I have and the people that are in it.  OK, now for some progress report pictures.

First I have to follow up on my "issue" from Thursday.  So in the post I mentioned that it was going to set me back "hours" or possibly "days".  Well fortunately it was only hours.  I was able to separate the cowling halves with just a little extra "force".  We are now back on track!

The 'glass has been laid in this picture.  Now its a matter of fill and sand, followed by more fill and sand...
After a little sanding the transition from the skin to the windshield is looking good on the forward edges.

The Top and sides still need a little work.  In fact I had to add a few more layers of carbon fiber and fiberglass to the roll bar lip to strengthen it a bit.  In this picture I have just added another layer of flox to be sanded down.  Another couple of iterations of flox and sanding should get me close to complete on this task.

If you look closely at the spaces between the inlets in the middle of this picture you can see where I laid several layers of fiberglass to form the flange for the front of the cowling.
Hanging the cowling so the fiberglass can set up on the inlet rings.

A bit hard to see but the white section is my new inlet ring grooved seat.  There is one very similar on the bottom cowl and when the two are mated it creates a very nice and secure mount for the inlets.

This is part of the induction system.  The induction system allows fresh outside air to pass through a filter and then feed the engine.  In this picture I had to add some fiberglass (ok a bit too much I agree) to the end to lengthen the inlet.  In the next picture you can see what it looked like when I was done.

Sanded and ready for more work.

One aspect to all the fiberglass work I am doing is I have to wait long periods of time once I do a layup waiting for the epoxy to harden.  So, I decided to get started on the baffles.  The baffles help direct the cool outside air over the cooling fins on the cylinders.  The engine is air cooled so its important that as much cooling air as possible flows where it will do the most good.  That's a lot of parts!  I thought I was about done with deburring, dimpling and riveting....ha!

So I got the back part of the baffling installed temporarily.  Then I set the James air plenum on the engine to see how much work it will require...Lets just say I have my work cut out for me....  Fit is not good.

Monday, September 22, 2014

Still working on the cowling

This weekend was great!  I had lots of time Friday evening and all day Saturday to work on the cowling and the windshield.  I got lots done but still have plenty to do on both.  The cowling is fitted and all quarter turn fasteners are in.  I still have to lay up (with fiberglass) the flanges that go on the front between the air inlets and the propeller opening.  That should happen Monday evening. Then its a matter of fitting the air inlet rings and cutting/fitting the oil door.

The windshield is getting ready for the fiberglass fairing that will surround it and provide a lip that the slider will sit under for weather seal.  I have cut the strips of fiberglass for the front but still need to do the top part with both fiberglass and carbon fiber.  I will be using carbon fiber for two of the layers to add extra strength to the lip in case somebody accidentally pulls themselves up using the lip.

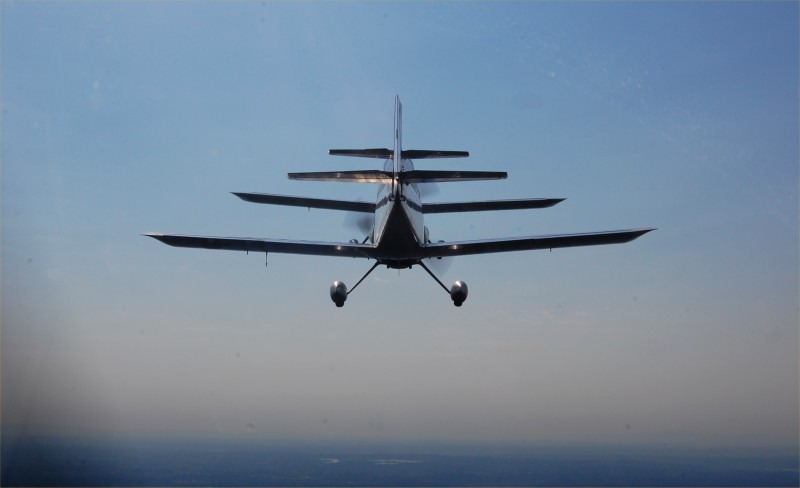
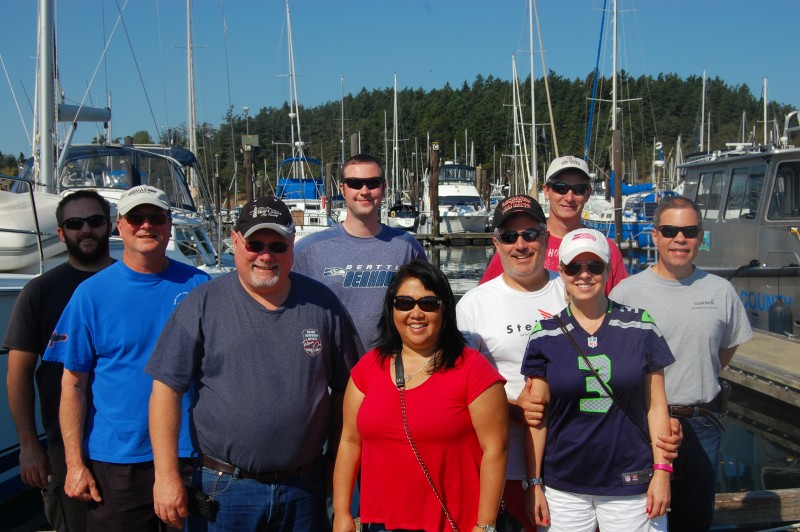
I also got to do some flying this weekend.  Jeff organized a "last of summer" hurrah of 5 RV's (two RV-7's, one RV-8, one RV-4 and on Harmon Rocket) and we flew up to Friday Harbor for lunch.  Of course no trip to Friday Harbor is complete without some ice cream so we had that too before we made the trek back to the airport to fly home.  On the way home we had some great flying weather so we did lots of interesting flying.  We started with some formation flying followed by some extended trail flying.  The extended trail was a lot of fun because its essentially follow the leader in the air.  We were on our way to Snoqualmie when we did this so the scenery was spectacular.  I took a ton of pictures with Jeff's camera so I don't have any to post here but Jeff promises he will post them on his blog.  We followed that up with a couple of trails of smoke over Snoqualmie and then some close trail which is a very close trail formation that had some very cool views.  I really hope I can get some of those pictures soon. (EDIT:  I linked a couple of pictures from Jeffs website below)

Lots happening right now in the aviation part of my life including a couple of friends who did their first flight in the past month.  One guy flew his RV-9A (same airplane I am building) this month and ended up with a "heavy" wing.  That means that the airplane wants to slightly turn all the time in one direction as if that wing was heavier than the other.  He troubleshot the cause down to a slightly twisted right flap so he borrowed mine to see if that solved the problem, and it did!  So now part of my airplane has already flown.  :-)

Anyway enough chat, on with the show!

Sunday evening status picture.

Started working on the windshield fairing this week.  Here you can see where I have sanded the excess Sikaflex glue from around the edges.  I also taped off the glass and put a green band of electrical tape where the edge of the fairing will be.  Then I roughed up the plexi so that the epoxy would stick nicely and then I put a layer of epoxy and flocking down.

Here it is after I had finished the epoxy and flox.  I don't think I mixed the the flox into the epoxy well enough because it came out somewhat lumpy, or maybe it was a result of the black pigment I put into the mixture but in any case I put a second coat of epoxy and micro (microscopic glass beads) to smooth things up after I had sanded it down to make sure there were no air voids.

Moving on to the cowling I managed to get the quarter turn fasteners installed on the lower cowl in this picture.

Part of the process of installing quarter turn fasteners requires some kind of backing be attached to the lower cowl for the receptacles.  There are two options, one is to install an aluminum strip similar to what I did on the firewall.  The other is what I opted to do and that is to lay up a nice fiberglass lip.  This required me to rough up the lower cowling along this horizontal seam and then apply two coats of mold release to the top cowling.  Then I mated both halves together using scrap aluminum and cleco's (I have a few holes to fill in the cowl now).  Once the outside edges were flush I layed up five layers of 3" glass "tape" and applied it to the seam between top and bottom cowl.  In this picture you see the result after the epoxy had hardened and I had separated the two halves.  The black line is where I later went in and trimmed the "flange" to the size I wanted it.

Here you can see the new flange after I had trimmed the edges and drilled the holes for the quarter turn receptacles.  I needed some soft rivets to install the receptacles so I stopped at Spencer (Thun Field) and picked up an ounce of them.  I have to say I really like the look of the flange.  Not only does the top cowl fit like a glove but I don't have to worry about puckering that some people have when they try to use the aluminum strip.


Here you can see the top cowling after I installed the quarter turn fasteners.  Still have to wait until the receptacles are installed before I can start working on the big cooling air rings and the forward section of the cowling.
Here are the strips of fiberglass that will be used for the windshield fairing that goes around the front and sides.  The strips start at a half inch wide and go up to two inches a quarter of an inch at a time.


See that space between the openings on either side of the propeller opening?  That's the space I need to lay up two more fiberglass flanges that will allow me to use a platenut (an attached nut essentially) and screw to hold the front of the cowling together.

A little hard to get perspective on this picture but I took a picture of the inside of the seam between the two cowling halves.  The quarter turn receptacles are installed in the fiberglass flange you saw earlier and the cowling is fastened together off of the airplane (for more work).  In this picture you are looking at the inside of cowling through the propeller opening.

Close trail picture.  There are actually two planes ahead of us in this picture but it looks like a one with lots of wings!
Here is the group picture we took on the docks at Friday Harbor.